Here are some links for help with blogger. Thanks, Amanda!
1. Blogging Basics 101
2. Blogger Tricks
3. Split Decisions
If you try anything mentioned in this post, please leave a comment and let me know what you thought of it!
Saturday, May 24, 2008
Thursday, May 22, 2008
How many posts?
Saturday, May 10, 2008
How to create a header for your blog!
I am not one to reinvent the wheel...check this tutorial out!
If you try anything mentioned in this post, please leave a comment and let me know what you thought of it!
Monday, May 5, 2008
The easy way to keep track of blogs you love
Tuesday, April 22, 2008
Adding links
Khris is gonna be a guest contributor to Hoppy Helps! Please do NOT tell Sassy, but I think Khris has a crush on Hoppy:).
Here is her first official contribution:
To add a link to your posting you highlight the word that you want your readers to click on ....so if you are talking about Bonnie you highlight the word "Bonnie".....then click on the little icon that is above your posting box.....and that will bring up a field that you can put the link in. When you post the message the word Bonnie will be in a different colour for your readers to click on.
In your side bar where you have your links for your favourite blogs you need to click on your "dashboard" and then "layout". There you can click on a "page element" and then you click on the one that says "Link List"....there you can add you links. You can put a name then the link address.....then just the name shows on your blog rather than the whole link address.
Khris, you are amazing! Hoppy loves you...just don't tell Sassy!
If you try anything mentioned in this post, please leave a comment and let me know what you thought of it!
Here is her first official contribution:
To add a link to your posting you highlight the word that you want your readers to click on ....so if you are talking about Bonnie you highlight the word "Bonnie".....then click on the little icon that is above your posting box.....and that will bring up a field that you can put the link in. When you post the message the word Bonnie will be in a different colour for your readers to click on.
In your side bar where you have your links for your favourite blogs you need to click on your "dashboard" and then "layout". There you can click on a "page element" and then you click on the one that says "Link List"....there you can add you links. You can put a name then the link address.....then just the name shows on your blog rather than the whole link address.
Khris, you are amazing! Hoppy loves you...just don't tell Sassy!
If you try anything mentioned in this post, please leave a comment and let me know what you thought of it!
Tuesday, April 15, 2008
3 Column Blog Templates
I have had a lot of requests for 3 column blog information. I, personally, paid someone to do mine. Her link is in the side bar.
I have, however, since found this link which features some of the usual blog templates for Blogger in a 3 column format.
If you are felling froggy, leap on over there and check it out.
If you try anything mentioned in this post, please leave a comment and let me know what you thought of it!
I have, however, since found this link which features some of the usual blog templates for Blogger in a 3 column format.
If you are felling froggy, leap on over there and check it out.
If you try anything mentioned in this post, please leave a comment and let me know what you thought of it!
Monday, April 14, 2008
SaSSY meme Volume 3
Wanna play along? Click on the graphic!
Five sites I can not blog without:
1. Tiny URL
2. Convert things to HTML code
3. Blogger
4. Mr. Linky
5. G-Mail
If you try anything mentioned in this post, please leave a comment and let me know what you thought of it!
Sunday, April 6, 2008
What is a meme?
The best answer to this question ishere.
To participate in a meme simply follow the instructions. They are often found at the originating post...and not always in the post where you find the meme.
Be sure to always list and link to the originators' post AND the post where you found the link when it is possible. I have looked memes and awards up in Google to find the originator. If there is one you can't find...lemme know and I will try.
Part of doing memes is sharing the linky love:). Remember...link, link, link.
Here is a list of memes .
If you try anything mentioned in this post, please leave a comment and let me know what you thought of it!
Tiny URL...
Saturday, April 5, 2008
How to put Mr. Linky in a post
1. Go here.
2. Register for an account.
3. Check your e-mail. Follow the instructions in it.
4. Once logged in click on the Wizard link at the top of the page.
5. Choose the 'html only' AND the Original Auto-Linkies options.
6. Click the generate code button.
7. Mr. Linky gives excellent instructions at this point.
A. Put the header script into your template where he shows you. This is something you only ever have to do ONCE.
B. Put the auto link script into the post where you want Mr. Linky to show up.
C. In his Step 11, the website owner says you will get an error script when publishing your post. This has not happened to me at all.
Final Step...put the link to your first use of Mr. Linky here:
If you try anything mentioned in this post, please leave a comment and let me know what you thought of it!
Friday, April 4, 2008
SaSSY meme Volume 2
Wanna play along? Click on the graphic!
For those of you who know my friend Scrappynhappy also know that she recently had a blog re-do. I love it cos it features my gal Sassy.
I wanna let you know where you can get an affordable re-do that you will just love!
Nap Warden Designs says this on her blog:
Are you tired of the basic template? Do you long for something that shows you? Wouldn't a new look make you love blogging even more than you already do? Well, you've come to the right place! Let me tell you what I can do for you...
Custom header
Custom template
New avatar
Award/bling badge
Custom design project
Let me know what you need, to make your look you, and we'll get to work on it. I look forward to hearing from you!
Scrappynhappy wanted a 3 column set up for her blog and Nap Warden happily obliged:).
Read NW's review of her work on S&H's site here.
If you try anything mentioned in this post, please leave a comment and let me know what you thought of it!
No More Boxes Around Your Images!
Hoppy has been trying to help Betty take those annoying borders from around her siggie tags...for days. Woot~Woot~ Hoppy did it!!!! Now you can too!!!
In your blog go to Dashboard, then Layout, then Edit Html. In the box under Edit Template locate the following code:
post img...
padding...
border:1px...
Change that 1 to 0. Click Save Template. View your blog. Smile!!!
Clicking on this image will bring up a larger version of it for easier viewing:
If you try anything mentioned in this post, please leave a comment and let me know what you thought of it!
Thursday, April 3, 2008
How to put something in the sidebar of your blog.
There is a feature in the blog that I use called "Customize" where you can go in
and add a feature. I simply 'added a picture' on the left hand side, and then
inserted the badge I wanted to show up.
If you try anything mentioned in this post, please leave a comment and let me know what you thought of it!
and add a feature. I simply 'added a picture' on the left hand side, and then
inserted the badge I wanted to show up.
If you try anything mentioned in this post, please leave a comment and let me know what you thought of it!
Tuesday, April 1, 2008
Heads or Tails~
Today's Heads-or-Tails is: anything or any version of the word fool:). Although taken from an email here is a list of things I need to remember in order to not be a fool...with a little humor tossed in.
Christian One Liners:
Don't let your worries get the best of you; remember, Moses started out as a basket case.
Some people are kind, polite, and sweet-spirited until you try to sit in their pews.
Many folks want to serve God, but only as advisers.
It is easier to preach ten sermons than it is to live one.
The good Lord didn't create any thing without purpose, but mosquitoes come close.
When you get to your wit's end, you'll find God lives there.
People are funny; they want the front of the bus, middle of the road, and back of the church.
Opportunity may knock once, but temptation bangs on the front door forever.
Quit griping about your church; if it was perfect, you couldn't belong.
If a church wants a better pastor, it only needs to pray for the one it has.
God Himself doesn't propose to judge a man until
he is dead. So why should you?
Some minds are like concrete, thoroughly mixed up and permanently set.
Peace starts with a smile.
A lot of church members singing 'Standing on the Promises' are just sitting on the premises.
We're called to be witnesses, not lawyers or
judges.
Be ye fishers of men . You catch 'em - He'll clean 'em.
Coincidence is when God chooses to remain anonymous.
Don't put a question mark where God put a period.
Don't wait for 6 strong men to take you to church.
Forbidden fruits create many jams.
God doesn't call the qualified, He qualifies the
called.
God grades on the cross, not the curve.
God loves everyone, but probably prefers 'fruits of the spirit' over 'religious nuts'.
God promises a safe landing, not a calm passage.
He who angers you, controls you.
If God is your Co-pilot, swap seats.
Don't give God instructions -- just report for
duty.
The task ahead of us is never as great as the
Power behind us.
The Will of God never takes you to where the Grace
of God will not protect you.
We don't change the message, the message changes
us.
The best mathematical equation I have ever seen: 1 cross + 3 nails = 4 given.
***
Here is code for Heads-or-Tails is you wanna use it...just put in in your post that you do for this meme:).
<center><a href="http://headsortailshome.blogspot.com" target="_blank"><img src="https://blogger.googleusercontent.com/img/b/R29vZ2xl/AVvXsEiZSmlp14rlgINvKyO2Jzq65VqNIlEJtucvR8HIXW-QIIhCcSvJbSegP-crmXs-2j015MIfw4EyKrOLTEB8EdkvZ0TB0QL-0r2NGhbdMdg5AZsSF1n-0GPnf5YAu28AlJ9p2k5EjEP0jdZi/s320/heads-or-tails.gif" border="0" alt="Heads Or Tails Meme" /></a></center>
To visit other participants, just click on this graphic:
If you try anything mentioned in this post, please leave a comment and let me know what you thought of it!
Sunday, March 30, 2008
Link to Hoppy Helps
Help Hoppy get the word out! Link to him by taking the following code and placing it in your sidebar:
<a href="http://hoppyhelps.blogspot.com" target="_blank"><img src="https://blogger.googleusercontent.com/img/b/R29vZ2xl/AVvXsEgmuCILkMppWx-DHXDE1VIPPdNyDbGIFFKPPVmxeD9_sKscolAlVbCv-PvO_2cCXg0m2TfQObvSz3Y04Kl51KqzSoBFWixa8mTlp2ZHJjPke-p9DOIX843X_occFS3SmVH6ElL8_vPS6jKH/s200/hh-lg-150.jpg" border="0" alt=""id="BLOGGER_PHOTO_ID_5183702772491727746" /></a>
Here is what it will look like:
If you link to Hoppy Helps be sure to fill in the Mr. Linky and then leave a comment!
Thanx!
Make graphics here...
Blogs to check out!
1. Blogger, the blogging authority has a blog here.
2. G-Mail, the e-mail authority has a here.
I am making you an on-going offer:). If you visit these blogs and have any questions about what is there, comment here and I will do my best to answer them! If you leave the link to the page you have questions about, it would help me hop over there and take a look.
If you try anything mentioned in this post, please leave a comment and let me know what you thought of it!
Sticky posts anyone?
Have you been to a blog where everytime you go their the same post is at the top? My blog is like that. The welcome message will always be the very first post you see when you come here.
You can make a post permanently or temporarily 'sticky'. Isn't that good news? Here is how I did it.
1. Make your post as usual.
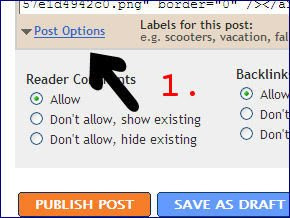
2. At the bottom it will look like this:
3. Click on 'post options.
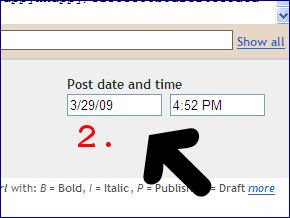
4. On the right there is a place where you can set the date and time of the post.
It looks like this:
In here put the date that you want the post to no longer be sticky.
5. Publish as usual. Now smile! You did it~
If you try anything mentioned in this post, please leave a comment and let me know what you thought of it!
Video shows you how to set up a blog!
Hidden ways to get more from your Gmail!
This really works!
If you try anything mentioned in this post, please leave a comment and let me know what you thought of it!
Saturday, March 29, 2008
How to make your own "cursive" siggie tag!
Did you notice my signature at the bottom of my first post? Isn't it sweet? Well, it came from a new site that I discovered and I would love to share it with you!
But in order to kill 2 birds with one stone(i.e...make my Sweetie happy) I am gonna post the link and site description in the form of a meme that Sassy started. Thank you for bearing with me!
Wanna play along? Click on the graphic!
The site I wanna share with you today is named "My Live Signature" and can be found here.
This is what they have to say about themselves:
They also offer some pretty cool services for a fee like animating your siggie or making a siggie from a scan of your actual signature, but as you may or may not know most of a frog's money is spent on specialty aphids for his gal and the occasional specialty fly for himself. But...I digress.
I would suggest that you register at the site although it is not required. Registering will enable you to save all of your siggies(cause no one can make just one) in one place and makes it simple for you to get code for all of them anytime you need it.
I suggest you hop on over there and give it a try! Their wizard makes the process simple and you may not need to read any more of my froggie-babble.
Just in case, tho, here is a break down of the steps. Come back and tell me what you think!
It is quite simple to make your siggies.
1. Go here.
2. Complete the short registration process.
3. Check your email. Click on the link provided and you will then be able to log in to the siggie site.
4. Click "Create a new signature".
5. Click "Using the signature creation wizard."
6. Type in the name you want on your siggie and then click "Next Step".
7. Select the font you want. (There are 120 options here. For your first time I suggest you pick one of the ones on the first page of options.) Click "Next Step" at the bottom of the page.
8. Select the size you want. Click "Next Step" at the bottom of the page.
9. Select the color you want. Click "Next Step" at the bottom of the page.
10. Select the slope you want. Slope is a goofy word for how much of a slant you want your siggie to have. Click "Next Step" at the bottom of the page.
11. Name your siggie so that you know what it is...(I named mine "green" for obvious reasons:). Click "Finish".
12. Smile! Doesn't your siggie just look grand?
13. To use your siggie, click on the link 'Use my signature' that is on the left. Choose the one you wanna use from the drop down menu. Then choose 'html code'. Copy and paste the code into a post.
Here is Bettys!
Not only did I make my green siggie there, I told Sassy about it and she made one, too...smart gal that she is.
But in order to kill 2 birds with one stone(i.e...make my Sweetie happy) I am gonna post the link and site description in the form of a meme that Sassy started. Thank you for bearing with me!
Wanna play along? Click on the graphic!
The site I wanna share with you today is named "My Live Signature" and can be found here.
This is what they have to say about themselves:
Making a signature is as easy as 1...2...3... All you need to do is follow our simple step-by-step wizard and you're good to go - no price tag attached. What are you waiting for?
They also offer some pretty cool services for a fee like animating your siggie or making a siggie from a scan of your actual signature, but as you may or may not know most of a frog's money is spent on specialty aphids for his gal and the occasional specialty fly for himself. But...I digress.
I would suggest that you register at the site although it is not required. Registering will enable you to save all of your siggies(cause no one can make just one) in one place and makes it simple for you to get code for all of them anytime you need it.
I suggest you hop on over there and give it a try! Their wizard makes the process simple and you may not need to read any more of my froggie-babble.
Just in case, tho, here is a break down of the steps. Come back and tell me what you think!
It is quite simple to make your siggies.
1. Go here.
2. Complete the short registration process.
3. Check your email. Click on the link provided and you will then be able to log in to the siggie site.
4. Click "Create a new signature".
5. Click "Using the signature creation wizard."
6. Type in the name you want on your siggie and then click "Next Step".
7. Select the font you want. (There are 120 options here. For your first time I suggest you pick one of the ones on the first page of options.) Click "Next Step" at the bottom of the page.
8. Select the size you want. Click "Next Step" at the bottom of the page.
9. Select the color you want. Click "Next Step" at the bottom of the page.
10. Select the slope you want. Slope is a goofy word for how much of a slant you want your siggie to have. Click "Next Step" at the bottom of the page.
11. Name your siggie so that you know what it is...(I named mine "green" for obvious reasons:). Click "Finish".
12. Smile! Doesn't your siggie just look grand?
13. To use your siggie, click on the link 'Use my signature' that is on the left. Choose the one you wanna use from the drop down menu. Then choose 'html code'. Copy and paste the code into a post.
Here is Bettys!
Not only did I make my green siggie there, I told Sassy about it and she made one, too...smart gal that she is.
Subscribe to:
Posts (Atom)