Sunday, March 30, 2008
Link to Hoppy Helps
Help Hoppy get the word out! Link to him by taking the following code and placing it in your sidebar:
<a href="http://hoppyhelps.blogspot.com" target="_blank"><img src="https://blogger.googleusercontent.com/img/b/R29vZ2xl/AVvXsEgmuCILkMppWx-DHXDE1VIPPdNyDbGIFFKPPVmxeD9_sKscolAlVbCv-PvO_2cCXg0m2TfQObvSz3Y04Kl51KqzSoBFWixa8mTlp2ZHJjPke-p9DOIX843X_occFS3SmVH6ElL8_vPS6jKH/s200/hh-lg-150.jpg" border="0" alt=""id="BLOGGER_PHOTO_ID_5183702772491727746" /></a>
Here is what it will look like:
If you link to Hoppy Helps be sure to fill in the Mr. Linky and then leave a comment!
Thanx!
Make graphics here...
Blogs to check out!
1. Blogger, the blogging authority has a blog here.
2. G-Mail, the e-mail authority has a here.
I am making you an on-going offer:). If you visit these blogs and have any questions about what is there, comment here and I will do my best to answer them! If you leave the link to the page you have questions about, it would help me hop over there and take a look.
If you try anything mentioned in this post, please leave a comment and let me know what you thought of it!
Sticky posts anyone?
Have you been to a blog where everytime you go their the same post is at the top? My blog is like that. The welcome message will always be the very first post you see when you come here.
You can make a post permanently or temporarily 'sticky'. Isn't that good news? Here is how I did it.
1. Make your post as usual.
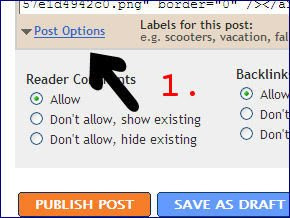
2. At the bottom it will look like this:
3. Click on 'post options.
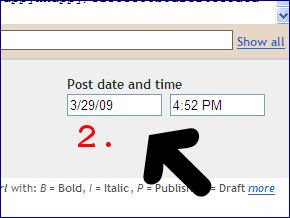
4. On the right there is a place where you can set the date and time of the post.
It looks like this:
In here put the date that you want the post to no longer be sticky.
5. Publish as usual. Now smile! You did it~
If you try anything mentioned in this post, please leave a comment and let me know what you thought of it!
Video shows you how to set up a blog!
Hidden ways to get more from your Gmail!
This really works!
If you try anything mentioned in this post, please leave a comment and let me know what you thought of it!
Saturday, March 29, 2008
How to make your own "cursive" siggie tag!
Did you notice my signature at the bottom of my first post? Isn't it sweet? Well, it came from a new site that I discovered and I would love to share it with you!
But in order to kill 2 birds with one stone(i.e...make my Sweetie happy) I am gonna post the link and site description in the form of a meme that Sassy started. Thank you for bearing with me!
Wanna play along? Click on the graphic!
The site I wanna share with you today is named "My Live Signature" and can be found here.
This is what they have to say about themselves:
They also offer some pretty cool services for a fee like animating your siggie or making a siggie from a scan of your actual signature, but as you may or may not know most of a frog's money is spent on specialty aphids for his gal and the occasional specialty fly for himself. But...I digress.
I would suggest that you register at the site although it is not required. Registering will enable you to save all of your siggies(cause no one can make just one) in one place and makes it simple for you to get code for all of them anytime you need it.
I suggest you hop on over there and give it a try! Their wizard makes the process simple and you may not need to read any more of my froggie-babble.
Just in case, tho, here is a break down of the steps. Come back and tell me what you think!
It is quite simple to make your siggies.
1. Go here.
2. Complete the short registration process.
3. Check your email. Click on the link provided and you will then be able to log in to the siggie site.
4. Click "Create a new signature".
5. Click "Using the signature creation wizard."
6. Type in the name you want on your siggie and then click "Next Step".
7. Select the font you want. (There are 120 options here. For your first time I suggest you pick one of the ones on the first page of options.) Click "Next Step" at the bottom of the page.
8. Select the size you want. Click "Next Step" at the bottom of the page.
9. Select the color you want. Click "Next Step" at the bottom of the page.
10. Select the slope you want. Slope is a goofy word for how much of a slant you want your siggie to have. Click "Next Step" at the bottom of the page.
11. Name your siggie so that you know what it is...(I named mine "green" for obvious reasons:). Click "Finish".
12. Smile! Doesn't your siggie just look grand?
13. To use your siggie, click on the link 'Use my signature' that is on the left. Choose the one you wanna use from the drop down menu. Then choose 'html code'. Copy and paste the code into a post.
Here is Bettys!
Not only did I make my green siggie there, I told Sassy about it and she made one, too...smart gal that she is.
But in order to kill 2 birds with one stone(i.e...make my Sweetie happy) I am gonna post the link and site description in the form of a meme that Sassy started. Thank you for bearing with me!
Wanna play along? Click on the graphic!
The site I wanna share with you today is named "My Live Signature" and can be found here.
This is what they have to say about themselves:
Making a signature is as easy as 1...2...3... All you need to do is follow our simple step-by-step wizard and you're good to go - no price tag attached. What are you waiting for?
They also offer some pretty cool services for a fee like animating your siggie or making a siggie from a scan of your actual signature, but as you may or may not know most of a frog's money is spent on specialty aphids for his gal and the occasional specialty fly for himself. But...I digress.
I would suggest that you register at the site although it is not required. Registering will enable you to save all of your siggies(cause no one can make just one) in one place and makes it simple for you to get code for all of them anytime you need it.
I suggest you hop on over there and give it a try! Their wizard makes the process simple and you may not need to read any more of my froggie-babble.
Just in case, tho, here is a break down of the steps. Come back and tell me what you think!
It is quite simple to make your siggies.
1. Go here.
2. Complete the short registration process.
3. Check your email. Click on the link provided and you will then be able to log in to the siggie site.
4. Click "Create a new signature".
5. Click "Using the signature creation wizard."
6. Type in the name you want on your siggie and then click "Next Step".
7. Select the font you want. (There are 120 options here. For your first time I suggest you pick one of the ones on the first page of options.) Click "Next Step" at the bottom of the page.
8. Select the size you want. Click "Next Step" at the bottom of the page.
9. Select the color you want. Click "Next Step" at the bottom of the page.
10. Select the slope you want. Slope is a goofy word for how much of a slant you want your siggie to have. Click "Next Step" at the bottom of the page.
11. Name your siggie so that you know what it is...(I named mine "green" for obvious reasons:). Click "Finish".
12. Smile! Doesn't your siggie just look grand?
13. To use your siggie, click on the link 'Use my signature' that is on the left. Choose the one you wanna use from the drop down menu. Then choose 'html code'. Copy and paste the code into a post.
Here is Bettys!
Not only did I make my green siggie there, I told Sassy about it and she made one, too...smart gal that she is.
Subscribe to:
Posts (Atom)